All too often beginners will say something like “Wow, the mastering on sounds amazing”. I know this because I used to say the same thing. In reality its the mixdown that sounds amazing and the mastering just helped enhance it.
The first time I realised this was during this short email exchange with one of my favourite producers, Direct of Monstercat.
It went something like this:
Hey man! Really love your music! Just wanted to ask who masters your stuff? I have a finished track I’d like a fresh pair of ears to master. If you master your own stuff can you let me know what you would charge? If not do you have a contact for me?
Hey, I tend to do my own masters. But unfortunately, I do not really do masters for other people since my mastering is pretty simple. I pretty much just put Invisible Limiter on my master channel and call it done haha.
Thank you for the interest though,
Wow, he uses only a limiter and his tracks sound THAT good!?
The reality is his mixing was amazing!
Mastering can be thought of as the final processing on a track to bring out the last 5-10% of shine.
Think of it like making a burger…
If you burn the bun and use a live pidgeon instead of a beef patty, it doesn’t matter how much mayonnaise you add, people will still be angry and confused when they try to eat it.
What I’m trying to say is your mixdown has to be damn near perfect in order to have a successful master.
But what if you’re a beginner and are incapable of creating perfect mixdowns, should you still master your tracks?
Of course, but don’t use the master as an excuse for lazy mixing. “I’ll fix it in the master” is the Harry Potter equivalent of saying “Lord Voldemort”. The intention of mastering should be to simply enhance a great mixdown.
The goal of a good master is to:
- Control Dynamics – We use compressors and limiters to add punch, reduce dynamic range or tighten up certain ranges.
- Enhance Stereo Image – How wide or mono do we want certain ranges of the track to be?
- Add Warmth – Through the use of distortion and saturation plugins we can add a level of harmonic richness to the track.
- Final EQ – While most EQ decisions should be made in the mixdown phase we can use a final EQ on the master channel to control or enhance certain frequencies.
- Pushing Loudness – Through the use of limiters and/or saturation we can get a final loudness push.
Stage 1: Multiband Referencing
The first thing I like to do is to find a reference track to use. Generally I look for a track that is in the same genre, same key, using similar instruments and has similar energy to mine.
Next, I like to just turn down the reference track so it sounds as loud as mine. This is because the reference is already limited. I am only using it to compare the sound qualities and balance of the two tracks. Not the loudness at this point.
Pro tip: key bind the solo button so you can easily A/B between the reference and your track.
My track:
The reference:
What we are going to be doing is splitting the reference track up into 3 different frequency bands, and then comparing the dynamics, clarity and RMS/LUFS of each band to our own track.
What is RMS?
RMS stands for Root Mean Square. Without getting too technical, you can think of it as an average calculation of the peak volume of audio over a time period. This isn’t particularly useful for measuring the loudness of a track because you could easily have a single sound wave at 20hz playing at 0db constantly. This would be inaudible but your RMS meter would be telling you the track is at 0db RMS.
This is why most people tend to focus on LUFS (Perceived Loudness).
What is LUFS?
LUFS (Loudness units relative to full scale) takes into account the human ear and how sensitive we are to the different frequency ranges. For example, humans tend to perceive sounds around the 3kHz mark to be very loud. So having a track with a lot of 3kHz would get a high LUFS reading. This can be shown by playing a sine wave at 3kHz. It’s showing a very high LUFS reading and that makes perfect sense because it’s painfully loud to listen to.
Multiband Referencing Low Range
The first band is going to cover our sub range. Generally, 0 to around 100hz but this depends on what key your track is in and how high or low your kick and sub-notes are hitting, If your highest sub-note is only hitting at 80hz then I’d set the first band at around 0-90hz.
- Apply a multiband compressor to your track and set the lowest range to 0-100hz
- Copy the multiband compressor over to the reference track
- Note that the compressor should not be compressing at all, we are only using it to split the track into bands for now.
Next, solo the sub band on both tracks and listen to the qualities of the sound. Ask questions like:
- Can I clearly hear and feel the kick punching through the mix?
- Is it easy to hear the bassline sub?
- When compared to the reference are there any differences in the separation, punch, clarity?
- Look at the peak levels and RMS, is the kick MUCH louder or quieter than the bass or vice versa?
Here’s what I notice when comparing the two.
- The sub on the reference track’s bassline is shorter with a slightly punchier transient and a quicker decay. However, my bassline has longer notes that are more spread out so it makes sense. I still feel like a bit of compression could tighten it up and give it a cleaner feel.
- The levels seem pretty balanced in comparison.
What to do to improve the low end.
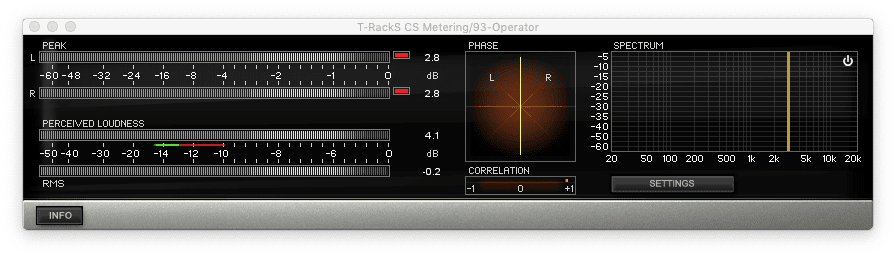
I am going to apply some compression to that range to glue the kick and sub together a bit more while using a long attack to emphasize the transients and create a bit more punch.
- Attack 185ms
- Release 300ms
- Threshold around 5db below the peaks
- Adjust ratio until you have 3-5db of gain reduction.
- Adjust output gain until it sounds as loud as when the compressor is disabled.
Ideally, I also want to go back into the sub synth patch and slightly shorten the decay. However, this isn’t always an option if you have already printed it to audio or if you are mastering someone else’s track. And lastly, I set the output gain of the reference track’s compressor so that both tracks have matching RMS on the low end.
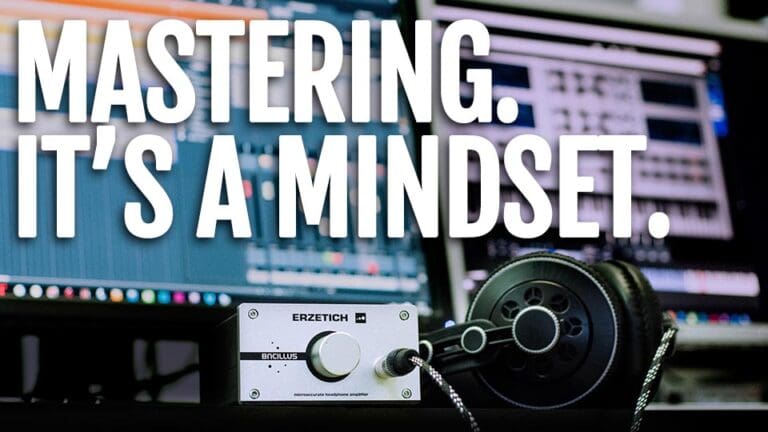
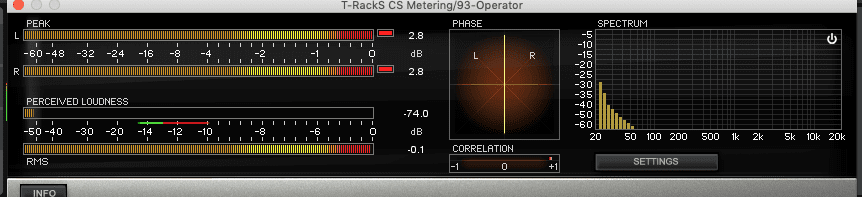
I should probably mention at this point that I use T-Racks CS Metering which is a free plugin for monitoring RMS/LUFS and stereo image.

Reference

My track
Why do I do that?
Because now we can balance the rest of the track around the low end which we know is at the same RMS as our reference track. All we need to do is match the mid and high ranges loudness and by the time we are ready to limit the track we should hopefully be able to achieve a similar LUFS/RMS overall and get it sounding commercially up to standard.
Multiband Referencing Midrange
We do the same thing with the midrange as with the low range.
- Solo the band (don’t forget to set your high bands crossover to match on both tracks. I’m setting mine to 7.2khz, just enough to catch the mids and high mids.)
- Listen and compare the qualities, is it as punchy? Or too punchy? Is it too empty? etc.
- Fix any issues.
- Match RMS.
Reference
My track
Right off the bat, I’m noticing a few differences.
- The vocal in the reference is more centered and up front.
- The bass pluck is shorter and takes up a bit less room. It’s also not as wide as mine.
- The kick is punching harder in the mid-range.
- I have another synth that’s taking up some space in the mid-range and possibly fighting a bit with the vocal and the bass pluck.
- The hat is coming through quite a lot louder in the reference.
1, 2, 4 and 5 need to be addressed in the mix, but if we don’t have access to stems the best way to deal with this would be to use Mid/Side EQ to boost the mids slightly and tame the sides around where the pluck and the vocal are sitting, this should in theory help focus them a bit.
For 3 we can compress the mid range in a similar way to the sub, maybe with slightly less gain reduction (2-3db.)
Here’s what my settings ended up looking like.

Multiband Referencing High Range
Again:
- Solo the band.
- Listen and compare.
- Fix any issues.
- Match RMS.
Reference
My track
I’m noticing a few big differences.
- The RMS is about 8db louder than mine!
- The hats specifically have much sharper transients.
- The main hat is quite upfront, centered and focussed.
To fix this:
- I would usually go into the mix and turn up the main hat, or maybe replace the hat with one that sits more up front. That might not be an option.
- Compress the top end quite hard with a long attack to emphasize the transients, which in turn would bring them more upfront and also make the top end groove a bit better.
- boost the output gain and maybe boost the top’s mid signal with M/S EQ to finish it off.
- Ideally, this needs to all be fixed in the mix but as we said that isn’t always an option so let’s try to address this with the tools at hand.
Here are my settings:

And the resulting sound.
Stage 2: Loudness Push
Now that we have the track somewhat balanced in comparison to our reference, we are going to apply a bit of compression, saturation and finally a limiter to try and get our track as loud as the reference.
For this I like to use Ableton’s Glue Compressor. Followed by the stock Ableton Limiter.
With the glue compressor I set the threshold a few db below the peaks, have a long attack to allow transients through and adjust until there is 2-3db of compression happening.
Once that is setup, you can enable the “soft clip” button which will allow us to saturate the whole mix by pushing the makeup gain into the soft clipper until you can audibly hear distortion, and then back off a few db.
I’m going to go off track and talk about soft clippers for a minute.
From there we push the limiter until we get around 3-5db of gain reduction or just until we can audibly hear the limiter having an effect on the mix and then back off a bit.

And here’s the master before and after:
Frequently Asked Questions
What is a soft clipper?
Soft clipping is the result of a peak of a waveform exceeding the maximum volume that a piece of hardware is able to accurately reproduce. In analogue circuitry, this maximum volume is dictated by the maximum voltage the circuit can put out, now, because the peak cant be reproduced above this maximum level, the waveform gets squared off, which causes distortion and adds some nice warm harmonics to the sound while acting like a limiter.
Ableton Soft Clippers – Ableton has a few effects that are capable of soft clipping but my favorite ones are Glue Compressor, Saturator, and Overdrive. The best way to use them is to drive the signal into them until you feel like the distortion is a bit over the top, and then back off until you find the sweet spot.
How do I upload my songs from Ableton to SoundCloud?
You can upload directly from Ableton to SoundCloud by going to File > Export Audio/Video, and then enabling the “Upload to SoundCloud” option in the export settings. A browser window will then open up and allow you to log in to Soundcloud and choose your upload settings.
Is mastering necessary?
It depends on the current state of your track. If all your levels are perfect, your track is as loud as other professional tracks, there’s no digital clipping and the song sounds great then arguably you don’t need any mastering. However, 99% of the time people will get their tracks mastered or send them to a professional.
What’s the difference between mix and master?
Mixing is the process of taking the individual channels, or sounds in a record and adjusting each one on it’s own so that they fit together perfectly. Getting this step is right is paramount to achieving a professional sounding record.
Mastering is the process of adjusting the overall EQ, dynamic range and loudness of the master channel (all individual channels combined). In the context of an album mastering also serves the purpose of creating cohesion between all individual songs. The final step in the mastering process also involves choosing the right bit depth, sample rate, dithering and output format to prepare the record for media.
Should you normalize in Ableton?
To answer this you should first understand what normalization does.
Normalize will analyse the tracks amplitude and either bring the volume up or down until the loudest peak is at 0dB.
This may not be desirable if you have mastered the track to have peak at -0.3dB which is a common practice.
Another thing to take in to account is that normalizing increases the overall volume, which includes raising the noise floor, so if your track is very quiet you should look at increasing the loudness in the mixing and mastering phase.
Conclusion
- Mastering is more of a mindset than a textbook set of instructions to follow. You’re listening to the track and making decisions based on what you hear.
- You will always get better results fixing issues in the recording and mixing phase than you would trying to solve them in the master.
- Mastering, like mixing and composing, is an art form that takes tons of practice. If you reference tracks constantly and aim to improve just a little bit with each master you will eventually get where you want to be.
- You do not need expensive plugins to achieve a good master but they can definitely help. Generally, I use mostly Fabfilter and iZotope Ozone plugins as they give you more control. However, the Ableton stock plugins work just fine.