In this article, I will show you step by step how to create high-quality drums in Serum. I have also provided free Serum drum presets that you can download at the end of each section.
This guide will cover:
-
- Kicks
- Snares
- Open and closed hi-hats
Claps are covered in this article.
Before we dive in, I want you to understand my method of approach when designing sounds. I like to ask a few questions on the following 4 sound qualities before I begin working on the sound.
Sound source – Try and take a guess at what the waveform could be, is it a Sine? Maybe it’s just noise. Does it sound distorted?
Pitch – What is the pitch doing? Is it one solid tone? Is it changing over time? Is there even a pitch at all?
Amplitude – Think about the shape of the waveform. Does it have big, sharp transients? Or is it flatter? Does it decay over time? How fast does it decay?
Space – Do you want a dry, mono sound or more of a stereo sound? Do you think reverb is needed?
With these questions in mind let’s get started on creating our…
Kicks
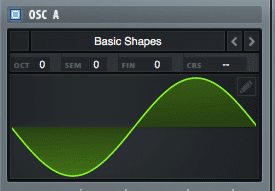
Sound source – I like my kicks to not be too distorted, not too many overtones or harmonics. A clean sine wave should do the trick. Let’s try that for now.
Open Serum and set OSC A to a sine wave.
Pitch – A kick usually has a tone, if it’s shorter it may be less noticeable. It goes from a high pitch down to a low pitch, the pitch it ends up on is usually what we refer to as the fundamental, it’s what tells us what key it’s in.
This is useful if we want our kick to be in a specific key. For the purpose of this, I want a kick in the key of G.
So what do we need?
- A note placed at G0
- A pitch envelope
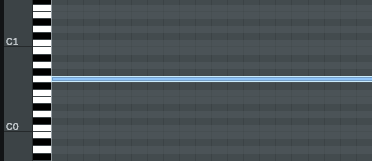
Let’s place a midi note at G0
Now, open Serum and set LFO 1 to Envelope Mode. Turn off the BPM toggle and set the rate to 4.1Hz Let’s draw what we think the pitch is doing. You can double-click anywhere in the LFO box to add or remove points.
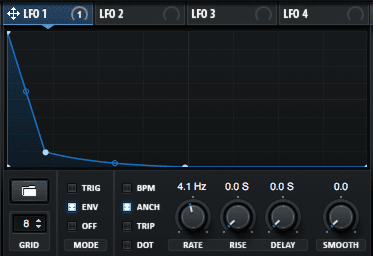
Now assign the LFO to the Course Pitch of OSC A. Drag the Amount slider to 24. Set the type to Unipolar.

We now have the following sound.
Amplitude – Kicks usually start off with a high amplitude and end low, just like the pitch, but not such a sudden drop. I want a nice short kick with not much of a tail.
Let’s open LFO 2. Assign it to the Level of OSC A. Remember envelope mode and set rate to 4.1 Hz. Now draw the shape you have in mind.
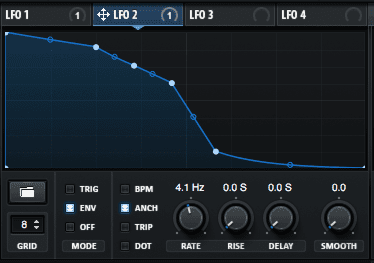
This shape sounds good to me and, if I bounce it to audio it looks how I’d expect a kick to look.

However, if I listen to it, it’s lacking a lot of punch.
I’m looking for a nice clicky transient to cut through the mix.
I’m going to use LFO3. Assign it to the Noise OSC level and use White Noise as the sound source. I just want a really fast burst of white noise to create that click.
Here are my settings.
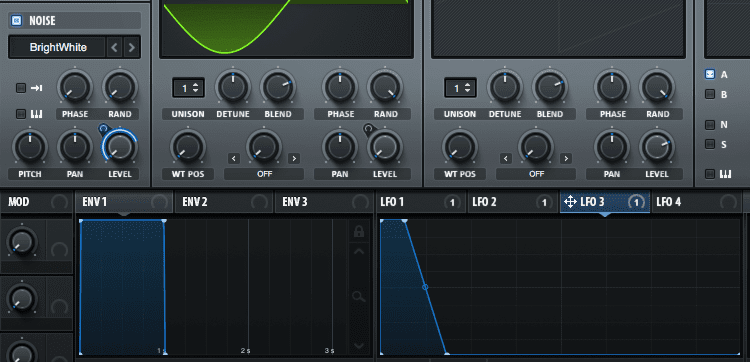
I then added a compressor with the following settings to bring out the transient. The long attack lets the transient through and pushes down on the body of the kick.

The compressor boosted the tail quite a lot so time to readjust the amplitude envelope (ENV 2).
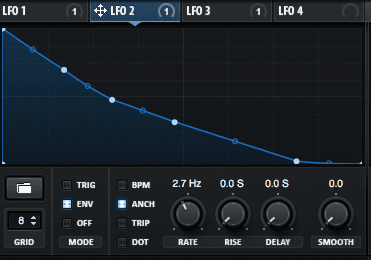
Still not happy with the punch of the kick I tweaked the pitch envelope a bit more.
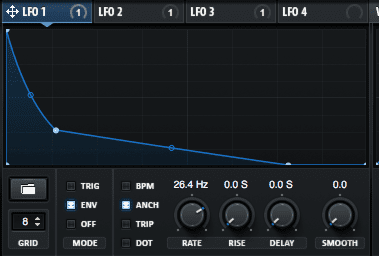
This is the final resulting waveform of the kick.

And how it sounds.
Space – I want a dry, mono sound so no reverb or additional effects are needed.
You can also download the preset.
SNARES
Sound source – In my mind, snares have a lot of harmonics and sound quite distorted. A sine wave could be used if we drive it/distort it enough. I think a Triangle is a better starting point though as it already has some harmonics.

The second sound source would be the “SSHH” sound of the snare, the noisy tail. For this, I’m going to use White Noise.

Pitch – Like a kick, a snare decays quickly in pitch. However, much faster than a kick as it is a smaller drum. It also sits a lot higher in the spectrum, while kicks usually sit in the sub frequencies, snares are around 200Hz and up.
I’ll stick to the key of G and place a MIDI note at G2 which is close to 200Hz.
Next, we can draw the pitch envelope and assign it to OSC A’s Course Pitch.
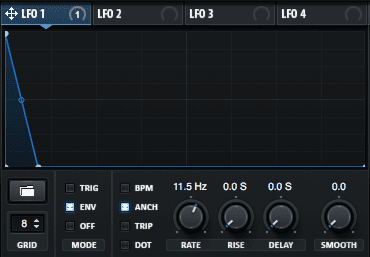
![]()
Which sounds like this.
Not quite there yet ;)
Amplitude – let’s shape the body of the snare with another LFO. I want a very short sound that starts loud and decays to nothing quickly.
Don’t forget to assign it to OSC A’s level.

I’m also going to add a low pass filter with the cutoff at 200Hz, boost the filter drive and resonance, then assign LFO 2 to the cutoff so that the initial hit has all the harmonics and they get cut out as it decays. This also boosts the fundamental.

Next, I add some tube distortion to give it a bit more aggression, and finally a multiband compressor to bring out the mids and compress the high-end.

Now the body sounds a bit better.
Now we need to shape the tail.
The tail should be longer than the body and decay a lot slower. I want the tail to fade in right after the initial transient of the snare hits. And then begin to decay immediately. Assign LFO3 to the White Noise’s Level and draw the tail as described.
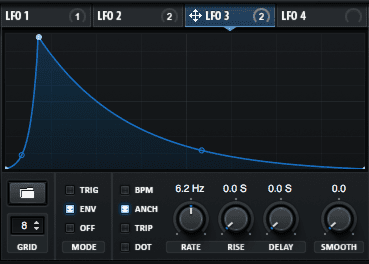
I’ve also assigned this LFO to an eq, boosting around 2kHz to give it some more “SMACK”.

The snare now sounds a lot better!
Space – As much as I’m not a fan of Serum built-in reverb, I wanted to add some space to the snare. I had it fade in just after the body of the snare and then added a band-pass around 1kHz to shape the tail a bit more. Both of these only get mixed in after the body as not to interfere with it.
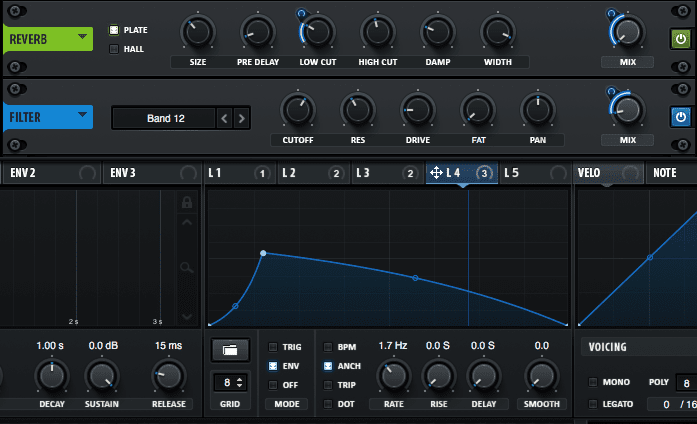
The final snare sounds like this.
You can download the preset here.
hi-Hats
Sound source – Closed hats are essentially just a short burst of white noise.
Set the noise osc to White Noise.
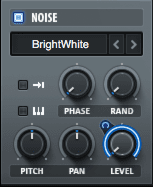
Pitch – There is no noticeable pitch on a hi-hat, especially not a closed one.
Amplitude – We want a nice short decay. Assign LFO1 to the Level of the Noise OSC and draw a shape similar to this.
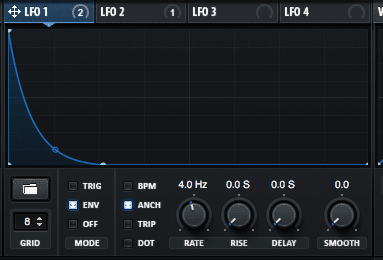
Next, I added a filter and boosted around 12kHz to give it a harsher “S” sound.

Space – The stock reverb didn’t work nicely on this hat, If needed you can try adding a tiny bit of room reverb using a plugin like Valhalla Room or something higher quality.
This is how the closed hat turned out.
You can download the preset here.
Open hats are done with the same method, we just have a longer decay.
Decrease the rate of the Envelope and give it a more gradual slope.

Next, I added some reverb and a highpass filter.

The final result sounds like this.
You can download the preset here.
Thanks for reading, feel free to comment and let us know if you found this helpful!
