So, you have a great song idea, the composition is down and has great potential. You call it a day and prepare for tomorrow’s task: to give your song the mix it deserves!
You wake up bright and early with fresh ears, and absolutely SMASH your first mixdown session, only to find out it sounds weak and amateur compared to some of your favorite tunes.
I’ve been there too, and over many years of trial and error, perfected a few techniques that have improved my mixes by leaps and bounds.
I’m here today to share these techniques, and hopefully, pave the way for anyone looking to create a professional mixdown and stand out from the crowd.
This article is going to be broken down into 6 fundamental topics:
- Sound selection
- Hierarchy of importance
- Leveling
- Sidechain compression
- EQ
- Stereo placement
Compression is covered in this article.
I’d strongly recommend watching Hyperbit’s video on Saturation to get a firm understanding of it. Fabfilter also does really good tutorials on compression and limiting.
Let’s get started…
Sound Selection
The best way to approach a mix is always from the ground up. Start as close to the source as possible, and then work your way up. If you are recording an instrument, make sure the mic placement is ideal, make sure there is no noise in the recording, no harsh resonances or human mistakes. It can be tempting to say to yourself “I’ll fix this later in the mixdown”, but your mixing process should begin from the moment you select your first instrument.
The idea here is to find sounds that are complementary, that sound good together. I need to emphasize this so I’ll say it again, find sounds that work well together! Do not listen to sounds in isolation when you’re choosing them, rather play them in the full context of the track.
For example, you have a great lead synth and need a bassline to fill out the low end of the track. It can be instinctive to then solo your bass channel and begin flicking through presets or designing a bass sound, this process could wind up being a complete time waster. Instead, listen to your lead and bassline together while you choose a preset.
If you have a sound that doesn’t sit well in the mix, before you reach for a compressor, or an EQ or whatever other plugins you think will solve the issue, first try swapping the sample out for another one. When choosing drums, for example, I’ll load up 50-100 similar drums into a sampler, loop a section of the track and just flick through them while listening in context, eventually, you will land on one that sounds great in context. At that point, 90% of your mixing issues are solved!
Hierarchy of importance
When approaching a mix, think about which element is going to be the star of your track, pick that sound first, and then mix around that.
Let’s analyze popular song ” Calvin Harris – One Kiss (with Dua Lipa)” together and then build a hierarchy of importance based on what we hear.
I’m going to focus on the chorus which starts at 1:00.
Right off the bat, we can say the main focus should be the vocal. Every sound we choose should be serving one purpose, that is to make the vocal sound good.
The very next thing I notice is the organ sounding synth chords. The drums are also very prominent. The bassline sounds great and does its job of filling out the low end but I wouldn’t say it draws my focus.
My hierarchy would look something like this:
- Vocal
- Synth
- Kick/Snare
- Bass
So, how do we use the list we just made?
I’d start by muting everything but the vocal and the synth. Now we listen.
Do they sound good together? If no, start by trying a few different synth sounds until you find one that sounds great with the vocal.
I know we are hypothetically mixing an already well-mixed track but this is just to give you an idea on how to structure your mixdown.
Next comes the drums, unmute the kick, how does it sound with the vocal and synth? Try out some other kicks, do they sound better? Unmute the clap and do the same.
Now all that’s left is to find the perfect bass patch to fit this four-piece puzzle.
Once all the main sounds are chosen you can then add in the rest, the hats, the ambient sounds, etc.
Leveling
Leveling is something that should be adjusted and controlled throughout the production process. Mastering this is something that takes years of practice and is really just about developing an ear for it. However, there are a few guidelines I’d like to recommend.
- Always set your levels after an extended period of rest, like first thing in the morning when you wake up. Ear fatigue is real and it’s almost impossible to get your levels right with tired ears.
- The focal elements should be your loudest elements, for example, vocals, leads, drums (whatever you want the listener to pay attention to).
- If you struggle with leveling try looking up the pink noise mixing technique. It is a surprisingly accurate way to get a relatively well-leveled mix.
Sidechain Compression and Volume Automation
Sidechain compression is one of the fundamental techniques we can use to clean up a mix and make things stand out when they need to.
Simply put, sidechain compression can be described as turning down one sound so that another sound can be heard clearly.
Here’s an example of a song I’m working on, I’ve used sidechain to make the drums stand out more, focus specifically on the kick drum. In the first example, it sounds weak and overpowered by all the other sounds. In the second example, you can hear it a lot more clearly, it almost sounds louder and punchier even though I haven’t done anything to the kick, all I’ve done is turned down everything else in the song when the kick hits and turned it back up as the kick fades out.
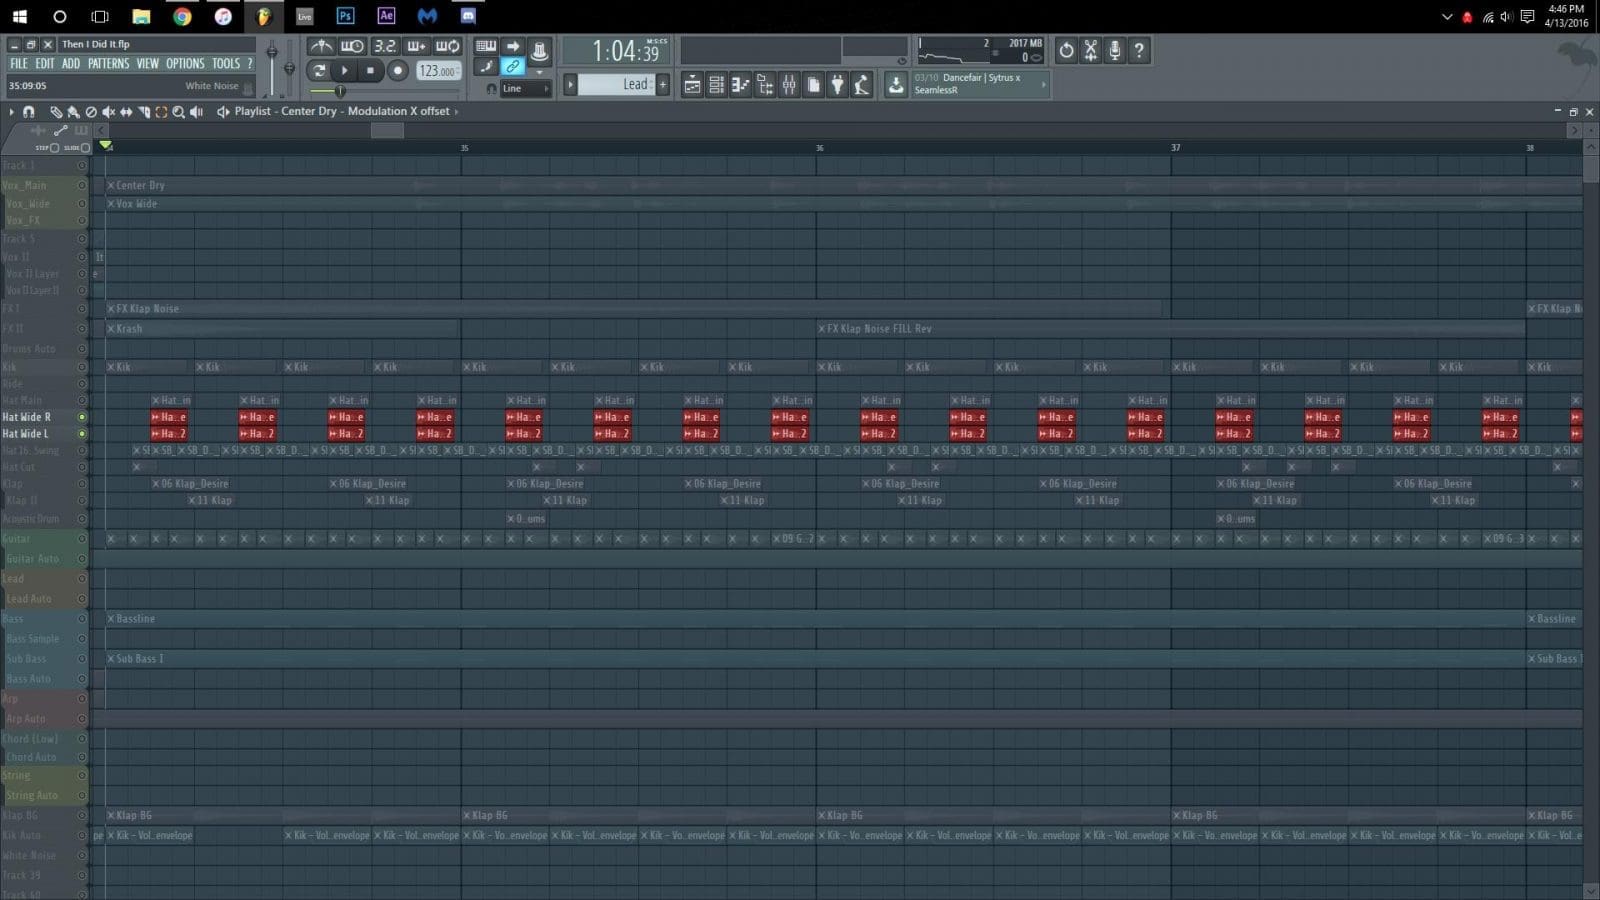
To explain how this is working I’m going to refer to the below image.
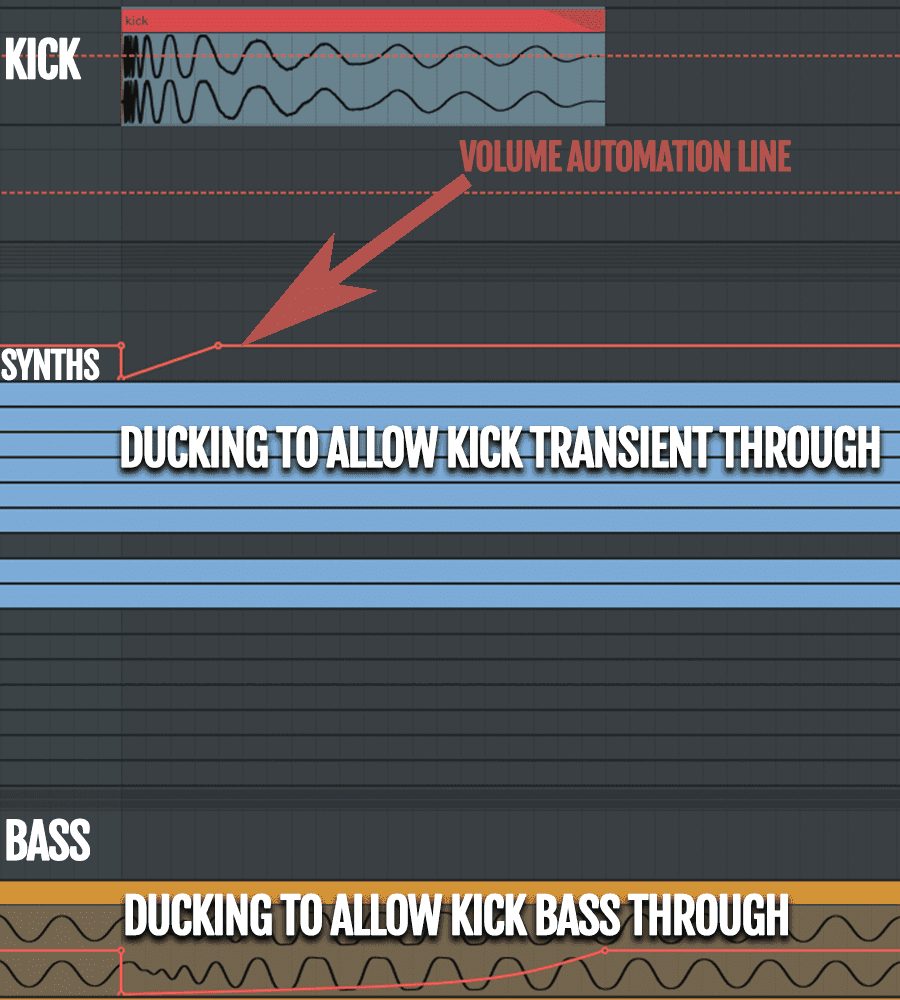
As you can see I have a kick, bass and synth bus. The Synth and Bass both have a plugin on them that allows me to control the volume of them. I am automating the synth volume so that the very first few ms of the synth is being turned down as the kick hits. The bass is doing the same but for the full duration of the kick. The reason for this is that the bass and the kick share the same frequencies whereas the synth and the kick are only sharing the same frequencies for a few ms (when the kick transient hits).
This method I’ve used is commonly known as volume automation but essentially achieves the same goal as sidechain compression.
So, what is the difference between sidechain compression vs volume automation?
Sidechain compression dynamically adjusts the volume based on the signal you put into it.
With volume automation, you draw a curve manually and apply that curve wherever you see fit (for example every time the kick hits).
Why would we choose sidechain compression over volume automation?
Imagine we have a big drop with synths and a lead vocal. We want to turn down the volume of the synths slightly, but precisely, and only when the vocal is playing.
We can either painstakingly try and draw in the volume automation.
Or we can use a compressor, and sidechain the synths to the vocal. This is completely dynamic and only requires an initial setup of the compressor. For this purpose, it is also far more accurate than using volume automation.
If you want to learn how to set up a sidechain compressor, I’d recommend googling “how to sidechain with *insert your compressors name here*” as there are far too many different compressors for me to explain it all.
If you’re wondering why I’d use volume automation over sidechain compression when iI did my drums, this was because:
- It saves me a ton of CPU in the long run
- I can draw a curve that is identical in shape every time. Whereas with compressors, if the source signal changes at all, your compressor will react to it.
There are a few plugins you can use to make volume automation easier. A few I’d recommend are:
The differences between the 3 are beyond the scope of this article, but there are plenty of reviews and tutorials on YouTube if you’re interested!
If you’re still having trouble understanding sidechain compression this is also a topic that has been covered extensively on YouTube.
EQ
Equalizers are a big topic but a pretty simple concept. They allow us to control the volume of different frequency ranges.
Most people using modern day DAWs will be familiar with what’s known as a parametric EQ. They allow us to click, create and drag points where ever we want on the frequency spectrum, and then reduce or boost the gain of those points.
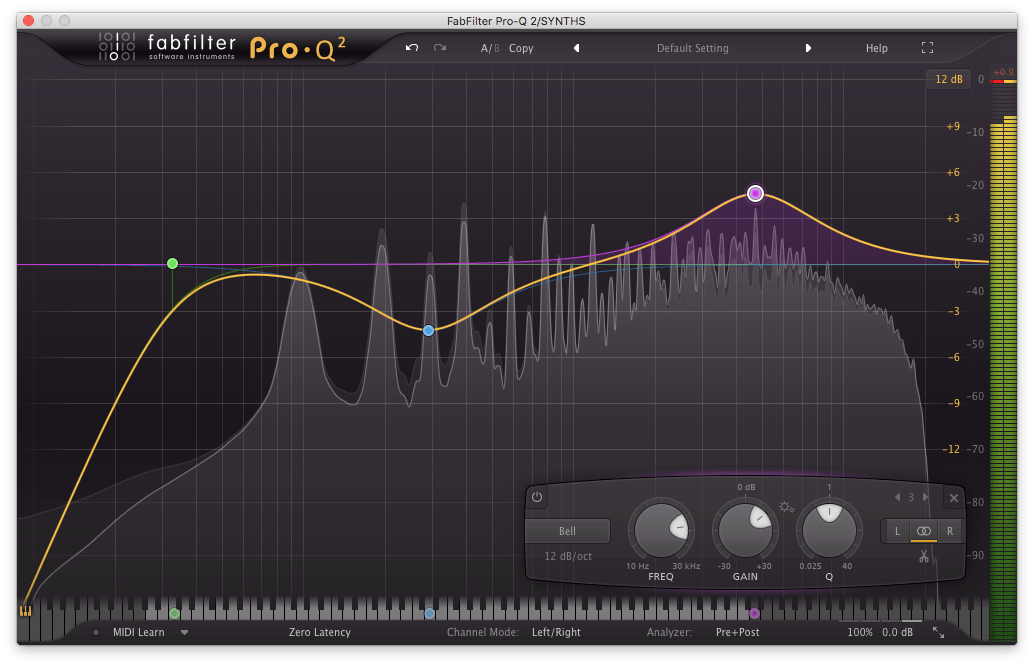
EQ Shapes
Most commonly we get 6 different EQ shapes
- High Pass
- Low Pass
- Bell
- Notch
- Band Pass
- Shelf

During the mixdown process, you will most commonly be using HP, LP, Bell and Shelf EQs.
As a general guideline:
- High Pass is used to remove un-needed low-end frequencies
- Low Pass is used to remove un-needed high-end frequencies
- Bell curves are used to boost or cut any given range
- Shelves are used to reduce or boost both the high end or the low end
Some things to note:
- HP and LP filters change the phase of the waveform, this can be resolved with a linear EQ, although linear EQs will still introduce transient smearing. Confused about all these terms? I suggest watching this video. The take away from this is that you need to make sure you understand what these EQs are doing to your sounds in order to make the right mixing choices.
- Try to cut rather than to boost, this produces a more natural sound. In the real world, frequencies are removed by objects and materials, so our ears are more accustomed to this type of effect.
Frequency Range Characteristics
There are certain frequency ranges that produce characteristic sounds, for example.
Below 100Hz the sub frequencies – “heavy”
180-225 Hz is usually where “muddyness“ lies.
400-600 Hz could be “nasal” or “boxy”.
1.6-3 kHz this is where our ears are most sensitive, so this could be labelled as “harsh”.
10 kHz and up, “airy” or “bright”, perhaps “harsh” too.
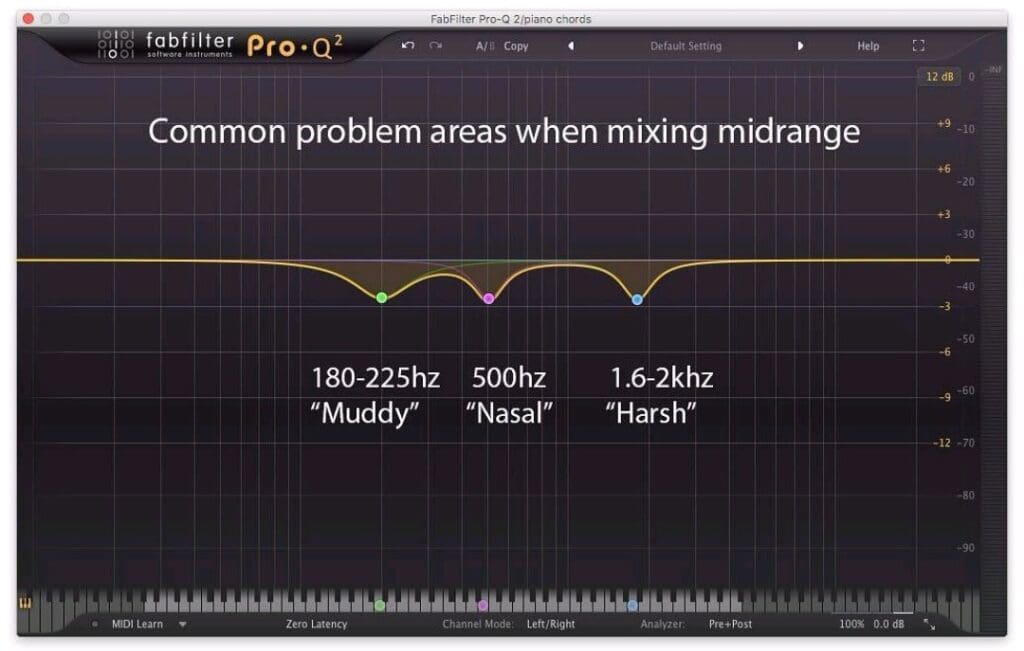
Gently cutting these with a bell curve can resolve these characteristics if they are an issue.
All EQ decisions should be made using your well-trained ear, don’t simply cut or boost ranges because you got told to. Listen, test, and then decide. And remember, these things take years of practice to perfect. Don’t expect to be a pro mixer by just reading articles. You need to PRACTICE!
Stereo Placement
Let’s begin with some basic fundamentals when it comes to achieving width.
- Good samples – finding good sounds with clear high ends are ideal for stereo effects. This obviously is the easiest and best option to take. Find professional samples, or take sounds from songs you like. I’m good at being able to pull kicks/hats/snares/claps from songs I like and layering parts of those with other samples. Pulling sounds from songs is a whole different topic for another day. However, I can recommend the following video which covers how to pull kicks from other tracks.
Ideally working with a sample that already has some good width is best.
- An Imager – This one is obvious. S1 works great, or iZotope Ozone’s Imager also. I love that one specifically because of its multiband feature, and it’s rather easy to use and control. Use these sparingly and make sure to constantly check your mix in mono to make sure the imager hasn’t introduced phasing issues.
- Panning – The easiest way to create width with 100% mono compatibility. I’ll expand on this a bit further on in this article.
- Haas delay – Essentially making a like-for-like copy of a sound, but ever so slightly offsetting it by a few ms and panning them in opposite directions. This creates an illusion of width. Again, make sure to constantly check for mono compatibility.
Now, to expand on panning as promised.
Look at the photo below:
So I have the same high hat panned hard left and hard right, because when it was just one high hat down the middle, it was phasing like crazy, and had poor stereo imaging and mono compatibility. You can hear how it turned out in the
song here:
It’s nothing fancy, just a basic workaround, but it certainly helped make the drums sound really wide during the chorus.
A good way to make sure something sounds nice and wide, but still has good mono compatibility is to pan one layer left, one right, and then detune one up a few semitones, and the other down a few semitones. That helps give the impression that it’s basically a “stereo recording” or a double take, when in reality it’s just cheating with software. It also helps to shorten or expand the length of the sample, so you don’t get phasing. It’s basically like vocal doubling: small changes in pitch, timing, length of notes, etc.
Right below that you see this weird pattern on a hat called “Hat 16th Swing”, which is panned to the Left, but is balanced out on the right side by what?
Reverb – Very short verbs (0 decay, short pre-delay) with a high pass on them are amazing when spread super wide, very quietly. Bus some of your high hats to a reverb like this, and literally compress the crap out of it, so it’s consistent. It should be very subtle, but it adds a lot of ambiance to the high end of the drums in the mix and can help spread the top end for a bigger sound.
Useful Reddit links
I think the first one is better for this specific topic, the second is more general to mastering, but it’s still good and touches the topic a bit! But basically, always be focusing on having wide sounds. Don’t wait until the general mix is made. Don’t wait until you’re about to master it. Do it while you EQ, compress, reverb, automate, bus, etc. I always tinker with it, because it’s an important element in the mix!
ONE MORE POINT (and for me, the most important, on how I balance the width of mixes) Think of it as a ying/yang idea.
“Yin and Yang describes how opposite or contrary forces are actually complementary, interconnected, and interdependent in the natural world, and how they give rise to each other as they interrelate to one another”
So you’re left side should work complementary with the right side. If you have heavy panning on one side, you should have a counterbalance to the other. If you have a slight 10L pan on your upbeat 8th note hi-hat, do the same to the right side, or do a heavier 25R pan on a quarter to half note high hat/perc also.
You could have a 10lbs rock in both sides to balance the scale, right?
Or you could have 10 lbs Left side, and ten 1 lbs Right side, and it would still be balanced.
The same goes for panning and the stereo field. A quarter note pattern 10L could be considered equal to an 8th note pattern 25R, perhaps. It will depend on the samples used of course, but the end goal is that the whole mix is focused on the center. So as long as it doesn’t “lean” towards one side, you should be good.
I think about it like that stupid statement: Would you rather fight 1 Horse sized duck, or 100 duck sized horses?Basically, treat your mix the same way. Pretend those statements are mathematically equal and go from there. Either frequent light panning to each side, or heavy, less frequent panning to bring the balance back to the center of the mix.
So you could have 1/16 notes panned 20L with 1/16 notes panned 20 R, OR…
1/16 notes panned 20L with 1/8 notes panned 50R, or whatever sounds good to bring the “weight” back to the center of the track.
Also, it’s good to keep a visual awareness of your mix. For this, I use T-Racks CS metering.
It’s free, CPU light, and works great!
That’s it!
If you found the article helpful or have any questions, please comment below. We’d love to hear from you.
Special thanks to TNAN for contributing his bit on stereo imaging.
Check him out below: